1. Introduction
- paper: CVPR2017_Joint Detection and Identification Feature Learning for Person Search
- code: caffe, [pytorch][https://github.com/Cysu/open-reid]
- project: End-to-End Deep Learning for Person Search
- memory: OIM, DIMN, MAR, ECN
1作: Shuang Li,跟过汤晓鸥。
这一篇文章之前就已经看过了,这次的主要目的是 memory 的使用,因为看到 memory 在 ECN、DIMN 中都有使用,所以看看大家都是怎么用的。
作者提出 Online Instance Matching (OIM) loss function 来融合 pedestrian detection and person re-id.
作者提出了新的数据集,18184 张图片,8432 个行人,96143 个行人框。
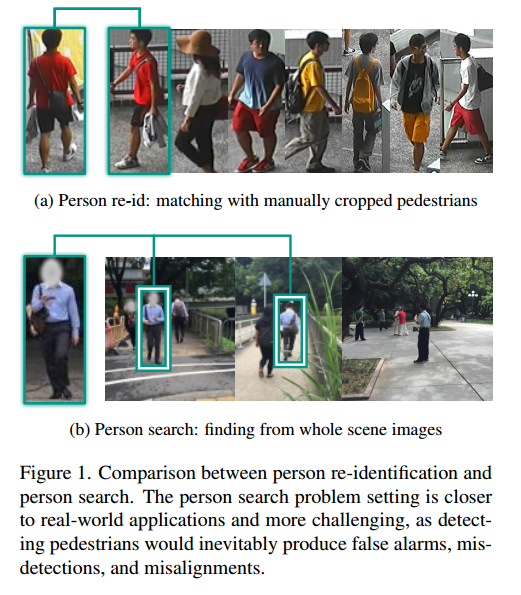
作者重新定义了 test 的过程。在传统的 test 过程中,gallery 中的图片是已经裁剪好的单个行人图片,作者定义 gallery 中的图片是未经裁剪、有多个行人的图片,需要匹配是哪张图片的哪个行人。

CNN 由两部分组成,给定一张 gallery image, a pedestrian proposal net 用于生成行人的 bounding boxes, 更偏向于召回率而不是精确度, 然后 a identification net 用于提取相应的特征。
3. Method

- a pedestrian proposal net
- a identification net
3.1 Online Instance Matching Loss
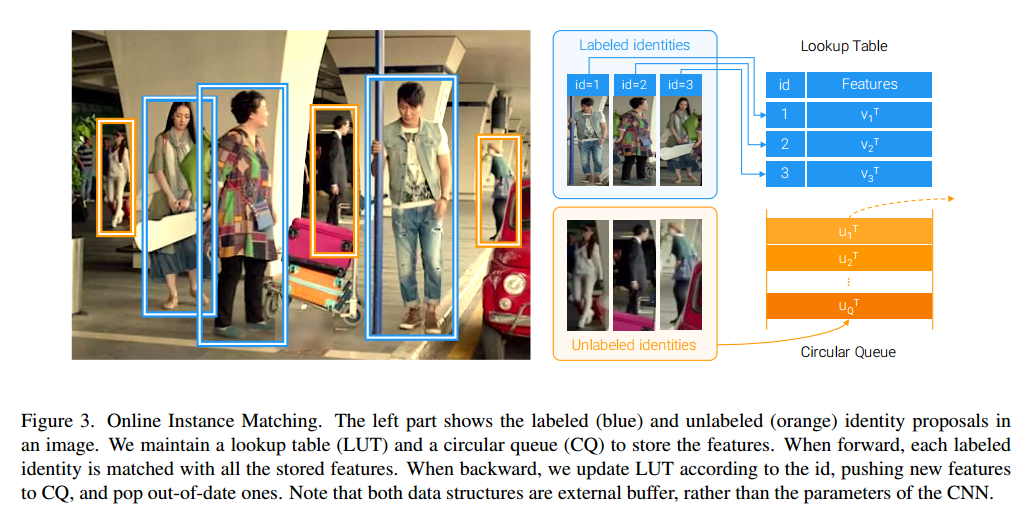
a pedestrian proposal net 共检测出三类:labeled identities, unlabeled identities, background clutter. 这里只考虑 labeled identities and unlabeled identities.
假设 a labeled identity $x\in R^D$,其中 $D$ 表示特征维度,作者建立了一个 lookup table (LUT) $V\in R^{D\times L}$ 来储存所有的 feature of all labeled identities,前向传播过程中,计算 cos 距离 $V^T x$,反向传播时 $v_t \gets \gamma v_t (1-\gamma) x$,其中 $\gamma\in [0, 1]$, 并进行归一化。这个过程和 ECN 基本一样。

对于 a unlabeled identites,使用 a circular queue $U\in R^{D\times Q}$ 来储存 the features of unlabeed identites that appear in recent mini-batches,其中 $Q$ 表示 queue size. 前向传播时,计算 cos 距离 $V^T x$,反向传播时,弹出 queue 顶端的 features,插入当前 batch 的特征。
通过上面两个结构,作者重新定义了 $x$ 属于某类的概率:
其中,更高的 $\tau$ 导致更平缓的分布。
损失函数为:
我觉得作者这里写错了,但无伤大雅。
其对 $x$ 的反向推导很有意思,是:
后面会补充整个推导过程
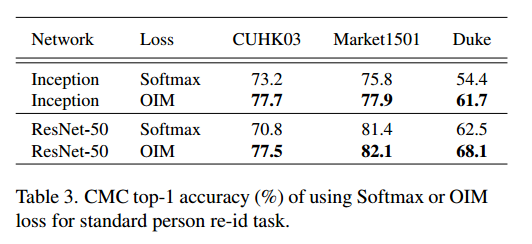
Why not Softmax loss: 作者不使用 Softmax loss 有两个方面的原因:第一个原因不是很理解,不是很赞同,第二个原因是 unkown identities 没有 label.
Scalability: 随着 id 的增加,分母的计算时间会成为瓶颈,所以采用 sub-sampling 的方法计算,具体见下文
除此之外,OIM loss 看似和 Softmax 相似,但是OIM loss是非参数的,缺点是容易过拟合,L2-normalized 能减少过拟合。
Question: Memory 是否真的比 fc 好用,是否可以单独做一个 memory 和 fc 的对比实验?
2019-06-12: ICCV 2019 三个 WR, 凉凉。
补充反向传播推导过程:
第一步:假设只有两个变量,很容易就可以推导到多个变量,令
不能随便地使用$f_1+f_2=1$,则
第二步:令 $x_1=v_1 x, x_2=v_2 x$:
则
第三步:计算损失函数,假设最优值是第一个, $L=-\log(f_1)$
第四步:推广到多个变量$v_1, v_2, v_3…$
4. Experiments
4.1 Effectiveness of Online Instance Matching


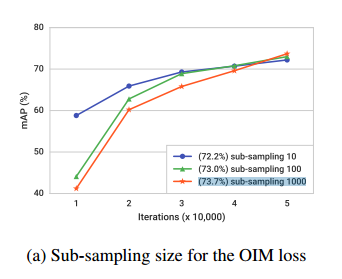
Sub-sampling the identities:

当 sub-sampling 的 size 更小的时候,最终性能差不多,但是收敛速度更快,说明了作者提出的方法能有效地处理大规模数据集。
Low-dimensional subspace: 作者对比了 128, 256, 512, 1024, 2048-dimention,发现原始的 2048 维特征得到结果不如其他。

5. code
从 open-reid 中只能看到 LUT 的代码,可以看出来,这个代码和 ECN 的代码可以说是一样,牛逼啊。
1 | from __future__ import absolute_import |
这里我有点晕,简单理一理。
第一,定义 operation: $output = F (input, target;\theta)$。因为 LUT 的前向传播和反向传播不同于一般的 operation,所以需要重新定义 operation,手动实现前向传播和反向传播,前向传播需要 lut, inputs,反向传播对 inputs 求导和 利用 target 对 lut 的更新。
第二,定义损失函数 Loss. 这个 OIMLoss 用了一个层来包装整个 operation 和 变量,方便管理。