0%

starGAN

0. 前言

因为在person-reid论文HHL中涉及到了starGAN,所以做一个StarGAN的阅读记录,并比较与CycleGAN的区别。

StarGAN Unified Generative Adversarial Networks for Multi-Domain Image-to-Image Translation

Yunjey Choi, Minje Choi, Munyoung Kim, Jung-Woo Ha, Sunghun Kim, Jaegul Choo

code-pytorch-official: https://github.com/yunjey/stargan
code-tensorflow: <https://github.com/taki0112/StarGAN-Tensorflow >

1. Introduction

解决多域之间图像转换一对多的问题,本文主要针对人脸进行改变。

关键词:multi-domain image-image translation

效果:转换效果如图所示
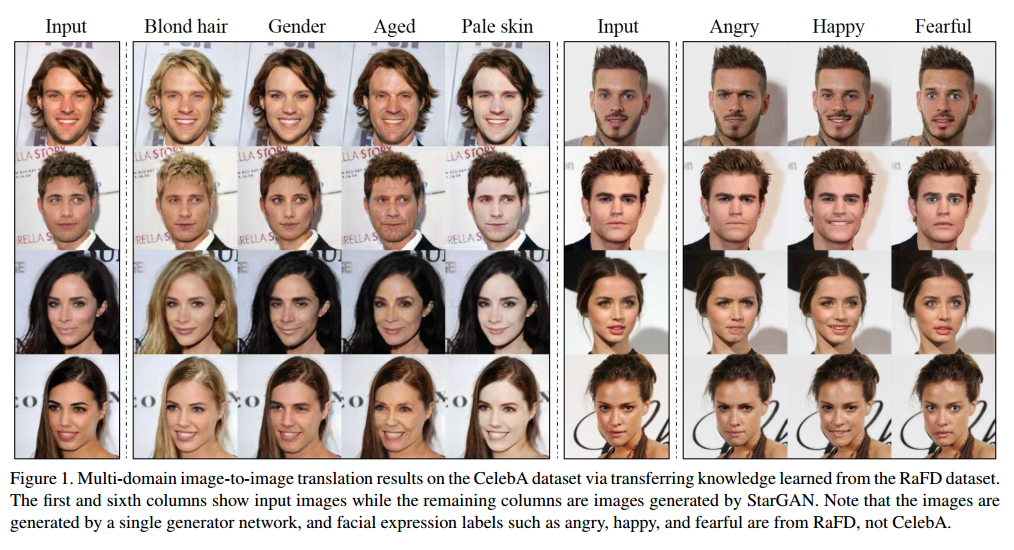
转换效果

网络模型:CycleGAN和StarGAN模型对比

starGAN有一个生成器G,两个判别器。
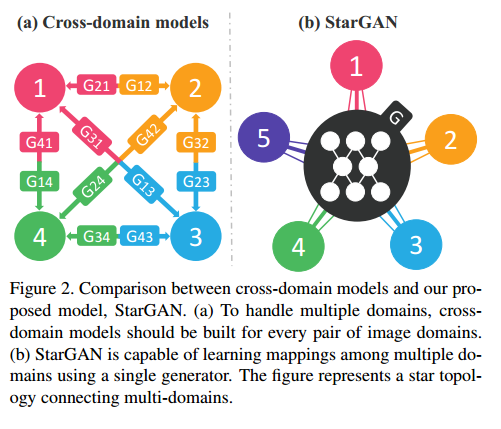
CycleGAN和StarGAN模型对比

备注

multi-domain:单数据集的不同属性作为了一个domain

multi-datasets:不同数据集的不同属性

starGAN 分为multi-domain和multi-dataset两种。

2. Star Generative Adversarial Networks

2.1 Multi-Domain Image-to-Image Translation

starGAN: starGAN的训练模型
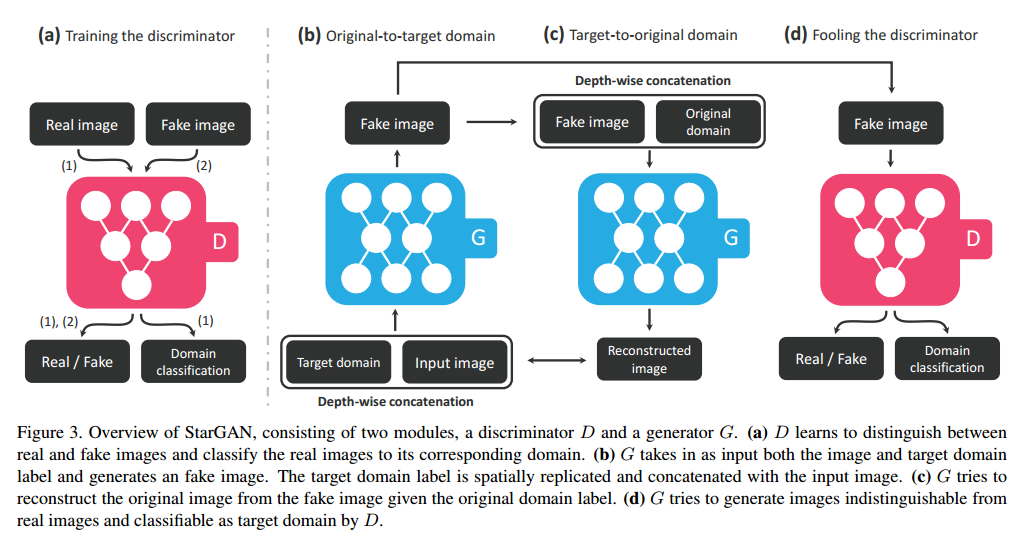
starGAN in mutli domain

To achieve this, we train G to translate an input image x into an output image y conditioned on the target domain label c, G(x; c) -> y. We randomly generate the target domain label c so that G learns to flexibly translate the input image. We also introduce an auxiliary classifier [22] that allows a single discriminator to control multiple domains. That is, our discriminator produces probability distributions over both sources and domain labels, D:x->{$D{src}$(x); $D{cls}$(x)}

符号说明:符号表

符号 含义
x input image
c target domain label
c’ source domain label
y generate image

Loss: training loss

Adversarial Loss:(CycleGAN也有)对抗损失

Domain Classification Loss:(特有)分类损失

That is, we decompose the objective into two terms: a domain classification loss of real images used to optimize D, and a domain classification loss of fake images used to optimize G.

优化 D:

By minimizing this objective, D learns to classify a real image x to its corresponding original domain c’.

优化 G:

G tries to minimize this objective to generate images that can be classified as the target domain c.

Reconstruction Loss: (共有)重构损失

Full Objective: 共有

2.2. Training with Multiple Datasets
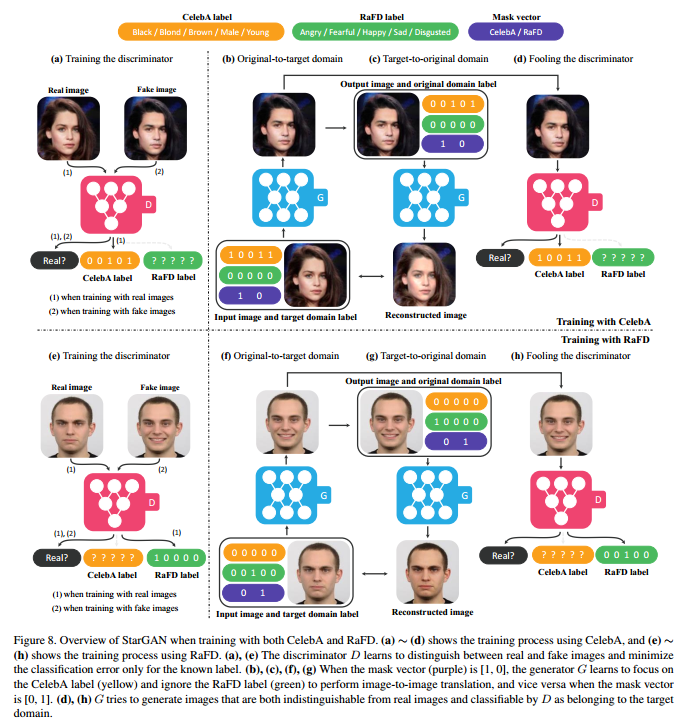
starGAN in multi datasets

StarGAN也适用于多数据集间的转换,上述过程中的重构损失要求数据集之间的标签一致(???)。针对这个问题,作者引入Mask Vector.

Mask Vector: 修改真值。

$c_i$ represents a vector for the labels of the i-th dataset. The vector of the known label $c_i$ can be represented as either a binary vector for binary attributes or a one-hot vector for categorical attributes. For the remaining n−1 unknown labels we simply assign zero values.

这样的话,所有的c都需要变成$\tilde{c}$

3. Implementation

Improved GAN training: 为了稳定训练过程,替代方程1.

Network Architecture: 类似CycleGAN。

G: Leaky ReLU: 0.01
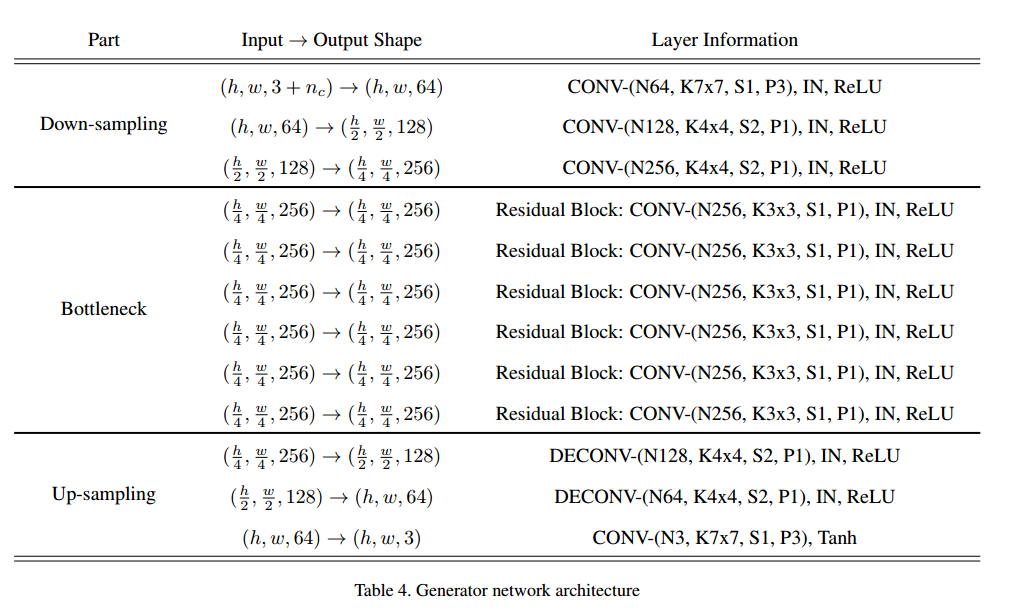
G

D: PatchGAN

现在网络架构可以看到的是作者使用的不是70x70的patchGAN,通过patchGAN的论文,也没有看到这种结构。
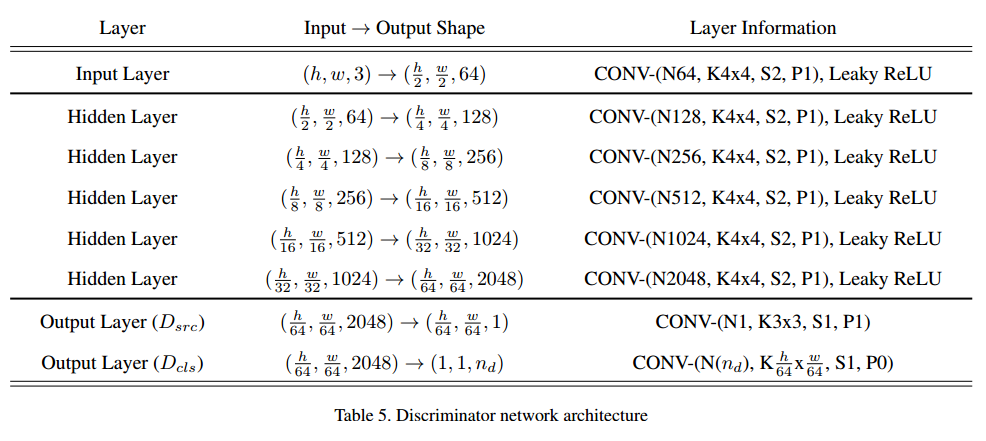
D

4. Experiments

4.1 Baseline Models

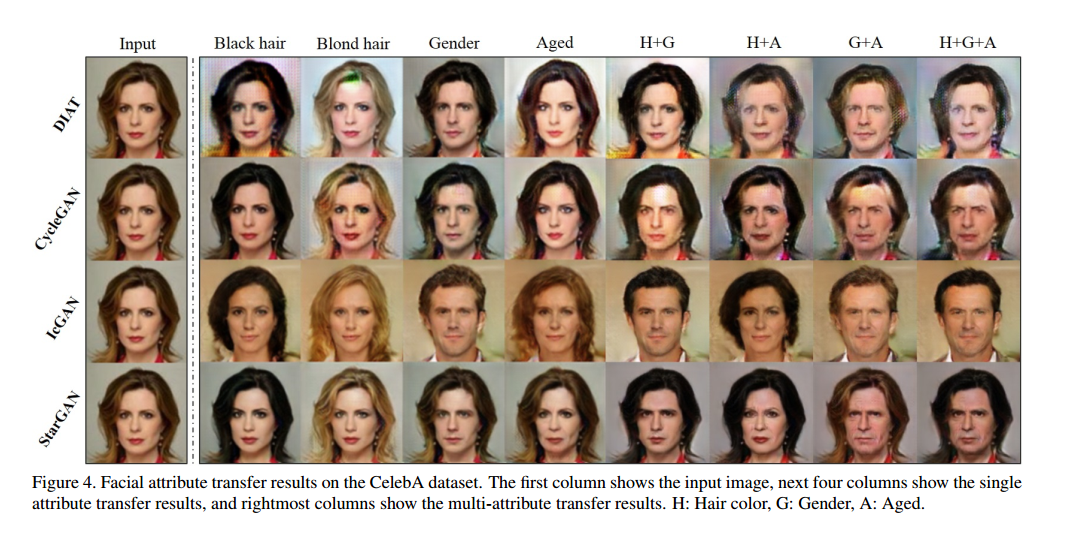
baseline models

通过结果可以看出,在Gender这个属性,ICGAN的转换效果要更好一些,但是损失了ID信息。

4.2 Training

  • Adam: $\beta_1=0.5, \beta_2=0.999$
  • Updates: one generator update after five discriminator updates
  • lr: For CelebA, 0.0001 for the first 100000 epochs, and linearly decay the lr to 0 over the next 100000 epochs. For the RaFD, 0.0001 for the first 100000 epochs, and linearly decay the lr to 0 over the next 100000 epochs.作者在论文写的是10和100,但是代码显示的是100000
  • batch: 16
  • input: For CelebA, crop: 178, resize: 128; For RaFD,

4.3 Results

作者通过人脸的转换实验,不仅说明了StarGAN在单数据集的不同domian中效果好,而且在多数据集的不同domian中效果也好。

5. 代码

在这里分析pytorch的代码,并对其中关键的代码进行解读。

如果不说明,则假设讨论单数据集的多域。

5.1 Model: G and D

Generator:
生成器Generator,结构与前面提到的网络架构一致,这里需要注意两点:

  • 当训练集是单数据集的多domain时,label需要扩充成图片大小,一起输入网络(这里有个疑问:网络真得能知道后面的通道是label吗)
  • 当训练集是多数据集的多domain时,label的维度是c+c2+2,因为有mask,同样需要广播成图片大小,一起输入网络

Discriminator:
判别器Discriminator,有个疑问是关于是感受野和计算损失的。
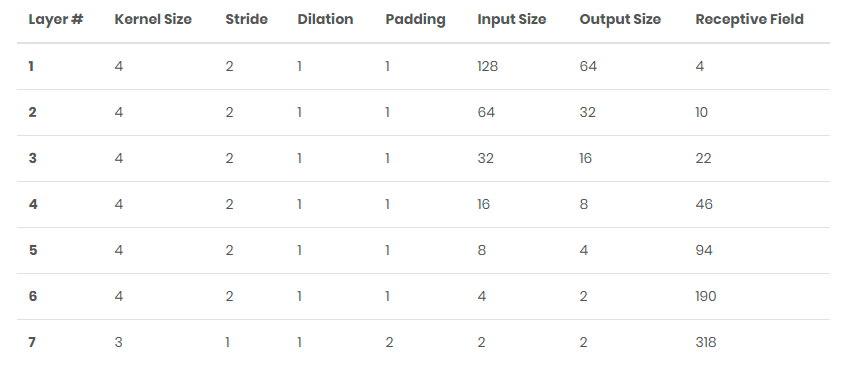
感受野

下面会提及到计算损失的。

1
2
3
4
5
6
7
8
9
10
11
12
13
14
15
16
17
18
19
20
21
22
23
24
25
26
27
28
29
30
31
32
33
34
35
36
37
38
39
40
41
42
43
44
45
46
47
48
49
50
51
52
53
54
55
56
57
58
59
60
61
62
63
64
65
66
67
68
69
70
71
72
73
74
75
76
77
78
79
80
81
82
83
84
class ResidualBlock(nn.Module):
"""Residual Block with instance normalization."""
def __init__(self, dim_in, dim_out):
super(ResidualBlock, self).__init__()
self.main = nn.Sequential(
nn.Conv2d(dim_in, dim_out, kernel_size=3, stride=1, padding=1, bias=False),
nn.InstanceNorm2d(dim_out, affine=True, track_running_stats=True),
nn.ReLU(inplace=True),
nn.Conv2d(dim_out, dim_out, kernel_size=3, stride=1, padding=1, bias=False),
nn.InstanceNorm2d(dim_out, affine=True, track_running_stats=True))

def forward(self, x):
return x + self.main(x)


class Generator(nn.Module):
"""Generator network."""
def __init__(self, conv_dim=64, c_dim=5, repeat_num=6):
super(Generator, self).__init__()

layers = []
layers.append(nn.Conv2d(3+c_dim, conv_dim, kernel_size=7, stride=1, padding=3, bias=False))
layers.append(nn.InstanceNorm2d(conv_dim, affine=True, track_running_stats=True))
layers.append(nn.ReLU(inplace=True))

# Down-sampling layers.
curr_dim = conv_dim
for i in range(2):
layers.append(nn.Conv2d(curr_dim, curr_dim*2, kernel_size=4, stride=2, padding=1, bias=False))
layers.append(nn.InstanceNorm2d(curr_dim*2, affine=True, track_running_stats=True))
layers.append(nn.ReLU(inplace=True))
curr_dim = curr_dim * 2

# Bottleneck layers.
for i in range(repeat_num):
layers.append(ResidualBlock(dim_in=curr_dim, dim_out=curr_dim))

# Up-sampling layers.
for i in range(2):
layers.append(nn.ConvTranspose2d(curr_dim, curr_dim//2, kernel_size=4, stride=2, padding=1, bias=False))
layers.append(nn.InstanceNorm2d(curr_dim//2, affine=True, track_running_stats=True))
layers.append(nn.ReLU(inplace=True))
curr_dim = curr_dim // 2

layers.append(nn.Conv2d(curr_dim, 3, kernel_size=7, stride=1, padding=3, bias=False))
layers.append(nn.Tanh())
self.main = nn.Sequential(*layers)

def forward(self, x, c):
# Replicate spatially and concatenate domain information.
# c: N*c_dim
# 生成器直接将目标域c在通道维度进行拼接
c = c.view(c.size(0), c.size(1), 1, 1)
c = c.repeat(1, 1, x.size(2), x.size(3))
x = torch.cat([x, c], dim=1)
return self.main(x)


class Discriminator(nn.Module):
"""Discriminator network with PatchGAN."""
def __init__(self, image_size=128, conv_dim=64, c_dim=5, repeat_num=6):
super(Discriminator, self).__init__()
layers = []
layers.append(nn.Conv2d(3, conv_dim, kernel_size=4, stride=2, padding=1))
layers.append(nn.LeakyReLU(0.01))

curr_dim = conv_dim
for i in range(1, repeat_num):
layers.append(nn.Conv2d(curr_dim, curr_dim*2, kernel_size=4, stride=2, padding=1))
layers.append(nn.LeakyReLU(0.01))
curr_dim = curr_dim * 2

kernel_size = int(image_size / np.power(2, repeat_num))
self.main = nn.Sequential(*layers)
self.conv1 = nn.Conv2d(curr_dim, 1, kernel_size=3, stride=1, padding=1, bias=False)
self.conv2 = nn.Conv2d(curr_dim, c_dim, kernel_size=kernel_size, bias=False)

def forward(self, x):
h = self.main(x)
# True or False
out_src = self.conv1(h)
# classes onehot
out_cls = self.conv2(h)
return out_src, out_cls.view(out_cls.size(0), out_cls.size(1))

5.2 input

对于任一张图片,其target label是随机取其他图片的label,而没有刻意去指定

1
2
3
4
5
6
7
8
9
10
11
# label_org和label_trg可以认为是单个图片的真实label,形式可以是[0,1,1,0]或者4,根据不同的数据集形式进行处理,前者是多分类label,后者是单分类label,用于计算损失
# c_org,c_trg是与图片一起输入网络的{0,1}向量,形式是[0,1,1,0]或者是[0,0,0,1]的形式,用于网络的输入
x_real, label_org = next(data_iter)
rand_idx = torch.randperm(label_org.size(0))
label_trg = label_org[rand_idx]
if self.dataset == 'CelebA':
c_org = label_org.clone()
c_trg = label_trg.clone()
elif self.dataset == 'RaFD':
c_org = self.label2onehot(label_org, self.c_dim)
c_trg = self.label2onehot(label_trg, self.c_dim)

5.3 train G and D

5.3.1 train D

这里需要对上述提到的损失函数做进一步处理。

判断图片真假损失:由方程6得:

判断原图片属性正确:由方程2得:

总损失

备注

  • 在计算真假损失的时候,是直接求输出的均值,这一点不是很理解。
  • 方程7的第三项的计算见gradient_penalty,对整个图片的梯度求和。
  • 方程8的的求解见classification_loss,就是一个简单的分类损失。
  • 不理解方程2为什么要加个符号?方程7也是符号正好相反?
1
2
3
4
5
6
7
8
9
10
11
12
13
14
15
16
17
18
19
20
21
22
23
24
25
# =================================================================================== #
# 2. Train the discriminator #
# =================================================================================== #

# Compute loss with real images.
out_src, out_cls = self.D(x_real) # out_src:N,1,2,2; out_cls: N,c_dim
d_loss_real = - torch.mean(out_src) # 方程7的第一项
d_loss_cls = self.classification_loss(out_cls, label_org, self.dataset) # 方程8

# Compute loss with fake images.
x_fake = self.G(x_real, c_trg)
out_src, out_cls = self.D(x_fake.detach())
d_loss_fake = torch.mean(out_src) # 方程7的第二项

# Compute loss for gradient penalty.
alpha = torch.rand(x_real.size(0), 1, 1, 1).to(self.device)
x_hat = (alpha * x_real.data + (1 - alpha) * x_fake.data).requires_grad_(True)
out_src, _ = self.D(x_hat)
d_loss_gp = self.gradient_penalty(out_src, x_hat) # 方程7的第三项

# Backward and optimize.
d_loss = d_loss_real + d_loss_fake + self.lambda_cls * d_loss_cls + self.lambda_gp * d_loss_gp # 总损失
self.reset_grad()
d_loss.backward()
self.d_optimizer.step()
1
2
3
4
5
6
7
8
9
10
11
12
13
def gradient_penalty(self, y, x):
"""Compute gradient penalty: (L2_norm(dy/dx) - 1)**2."""
weight = torch.ones(y.size()).to(self.device)
dydx = torch.autograd.grad(outputs=y,
inputs=x,
grad_outputs=weight,
retain_graph=True,
create_graph=True,
only_inputs=True)[0]

dydx = dydx.view(dydx.size(0), -1)
dydx_l2norm = torch.sqrt(torch.sum(dydx**2, dim=1))
return torch.mean((dydx_l2norm-1)**2)
1
2
3
4
5
6
def classification_loss(self, logit, target, dataset='CelebA'):
"""Compute binary or softmax cross entropy loss."""
if dataset == 'CelebA':
return F.binary_cross_entropy_with_logits(logit, target, size_average=False) / logit.size(0)
elif dataset == 'RaFD':
return F.cross_entropy(logit, target)

5.3.2 train G

与以往训练几个G之后才训练D不同,这里是训练几个D之后才训练G。

同样对上述提到的损失做进一步处理。

生成图片为真:由方程6得,与方程7正好相反:

生成图片的属性正确:由方程3得:

Reconstruction Loss: 重构损失

总损失

1
2
3
4
5
6
7
8
9
10
11
12
13
14
15
16
17
18
19
20
# =================================================================================== #
# 3. Train the generator #
# =================================================================================== #

if (i+1) % self.n_critic == 0:
# Original-to-target domain.
x_fake = self.G(x_real, c_trg)
out_src, out_cls = self.D(x_fake)
g_loss_fake = - torch.mean(out_src) # 方程9
g_loss_cls = self.classification_loss(out_cls, label_trg, self.dataset) # 方程10

# Target-to-original domain.
x_reconst = self.G(x_fake, c_org)
g_loss_rec = torch.mean(torch.abs(x_real - x_reconst))

# Backward and optimize.
g_loss = g_loss_fake + self.lambda_rec * g_loss_rec + self.lambda_cls * g_loss_cls
self.reset_grad()
g_loss.backward()
self.g_optimizer.step()

5.4 val

CelebA数据集:这里制作target domain label的方法分为头发属性(互相排斥)和其他属性(不排斥):对于选中的头发属性’Black_Hair’, ‘Blond_Hair’, ‘Brown_Hair’,则把5张图片的’Black_Hair’全部设为1,’Blond_Hair’, ‘Brown_Hair’设为0,作为第一个target domain label, 再把5张图片的’Blond_Hair’全部设为1,’Black_Hair’, ‘Brown_Hair’设为0,作为第二个target domain label, 再把5张图片的’Brown_Hair’全部设为1,’Black_Hair’,’Blond_Hair’ 设为0,作为第三个target domain label,对于其他属性,则直接取相反数做为第三个target domain label和第四个target domain label.

RaFD数据集:属于排斥属性,也和头发类似,对某一列全部设为1,其余设为0.

1
2
3
4
5
6
7
8
9
10
11
12
13
14
15
16
17
18
19
20
21
22
23
24
25
26
27
28
29
30
31
32
33
34
35
c_org
Out[24]:
tensor([[ 0., 0., 0., 1., 0.],
[ 0., 0., 0., 1., 1.],
[ 0., 0., 0., 1., 0.],
[ 1., 0., 0., 0., 1.],
[ 1., 0., 0., 0., 1.],

c_trg_list
Out[25]:
[tensor([[ 1., 0., 0., 1., 0.],
[ 1., 0., 0., 1., 1.],
[ 1., 0., 0., 1., 0.],
[ 1., 0., 0., 0., 1.],
[ 1., 0., 0., 0., 1.]], device='cuda:0'),
tensor([[ 0., 1., 0., 1., 0.],
[ 0., 1., 0., 1., 1.],
[ 0., 1., 0., 1., 0.],
[ 0., 1., 0., 0., 1.],
[ 0., 1., 0., 0., 1.]], device='cuda:0'),
tensor([[ 0., 0., 1., 1., 0.],
[ 0., 0., 1., 1., 1.],
[ 0., 0., 1., 1., 0.],
[ 0., 0., 1., 0., 1.],
[ 0., 0., 1., 0., 1.]], device='cuda:0'),
tensor([[ 0., 0., 0., 0., 0.],
[ 0., 0., 0., 0., 1.],
[ 0., 0., 0., 0., 0.],
[ 1., 0., 0., 1., 1.],
[ 1., 0., 0., 1., 1.]], device='cuda:0'),
tensor([[ 0., 0., 0., 1., 1.],
[ 0., 0., 0., 1., 0.],
[ 0., 0., 0., 1., 1.],
[ 1., 0., 0., 0., 0.],
[ 1., 0., 0., 0., 0.]], device='cuda:0')]
1
2
3
4
5
6
7
8
9
10
11
12
13
14
15
16
17
18
19
20
21
22
23
24
25
26
27
28
29
30
31
def create_labels(self, c_org, c_dim=5, dataset='CelebA', selected_attrs=None):
"""Generate target domain labels for debugging and testing."""
# Get hair color indices.
if dataset == 'CelebA':
hair_color_indices = []
for i, attr_name in enumerate(selected_attrs):
if attr_name in ['Black_Hair', 'Blond_Hair', 'Brown_Hair', 'Gray_Hair']:
hair_color_indices.append(i)

c_trg_list = []
for i in range(c_dim):
if dataset == 'CelebA':
c_trg = c_org.clone()
if i in hair_color_indices: # Set one hair color to 1 and the rest to 0.
c_trg[:, i] = 1
for j in hair_color_indices:
if j != i:
c_trg[:, j] = 0
else:
c_trg[:, i] = (c_trg[:, i] == 0) # Reverse attribute value.
elif dataset == 'RaFD':
c_trg = self.label2onehot(torch.ones(c_org.size(0))*i, c_dim)

c_trg_list.append(c_trg.to(self.device))
return c_trg_list

# Fetch fixed inputs for debugging.
data_iter = iter(data_loader)
x_fixed, c_org = next(data_iter)
x_fixed = x_fixed.to(self.device)
c_fixed_list = self.create_labels(c_org, self.c_dim, self.dataset, self.selected_attrs)

5.5 多数据集

在多数据集的情况下,损失函数大体不变,略微不同。

5.5.1 input

多数据集顺序输入

1
for dataset in ['CelebA', 'RaFD']:
1
2
3
4
5
6
7
8
9
10
11
12
13
14
15
16
17
18
19
celeba_iter = iter(self.celeba_loader)
x_real, label_org = next(celeba_iter)
rand_idx = torch.randperm(label_org.size(0))
label_trg = label_org[rand_idx]
if dataset == 'CelebA':
c_org = label_org.clone()
c_trg = label_trg.clone()
zero = torch.zeros(x_real.size(0), self.c2_dim)
mask = self.label2onehot(torch.zeros(x_real.size(0)), 2)
c_org = torch.cat([c_org, zero, mask], dim=1)
c_trg = torch.cat([c_trg, zero, mask], dim=1)
elif dataset == 'RaFD':
c_org = self.label2onehot(label_org, self.c2_dim)
c_trg = self.label2onehot(label_trg, self.c2_dim)
zero = torch.zeros(x_real.size(0), self.c_dim)
mask = self.label2onehot(torch.ones(x_real.size(0)), 2)
c_org = torch.cat([zero, c_org, mask], dim=1)
c_trg = torch.cat([zero, c_trg, mask], dim=1)

5.5.2 train D and G

1
2
3
4
5
6
7
8
9
10
11
12
13
14
15
16
17
18
19
20
21
22
23
24
25
26
27
28
29
30
31
32
33
34
35
36
37
38
39
40
41
42
43
44
45
46
47
48
49
50
51
52
53
54
55
56
57
58
59
60
# =================================================================================== #
# 2. Train the discriminator #
# =================================================================================== #

# Compute loss with real images.
out_src, out_cls = self.D(x_real)
out_cls = out_cls[:, :self.c_dim] if dataset == 'CelebA' else out_cls[:, self.c_dim:] # 属性损失只考虑一半
d_loss_real = - torch.mean(out_src) # 方程7的第一项
d_loss_cls = self.classification_loss(out_cls, label_org, dataset) # 方程8

# Compute loss with fake images.
x_fake = self.G(x_real, c_trg)
out_src, _ = self.D(x_fake.detach())
d_loss_fake = torch.mean(out_src) # 方程7的第二项

# Compute loss for gradient penalty.
alpha = torch.rand(x_real.size(0), 1, 1, 1).to(self.device)
x_hat = (alpha * x_real.data + (1 - alpha) * x_fake.data).requires_grad_(True)
out_src, _ = self.D(x_hat)
d_loss_gp = self.gradient_penalty(out_src, x_hat) # 方程7的第三项

# Backward and optimize.
d_loss = d_loss_real + d_loss_fake + self.lambda_cls * d_loss_cls + self.lambda_gp * d_loss_gp
self.reset_grad()
d_loss.backward()
self.d_optimizer.step()

# Logging.
loss = {}
loss['D/loss_real'] = d_loss_real.item()
loss['D/loss_fake'] = d_loss_fake.item()
loss['D/loss_cls'] = d_loss_cls.item()
loss['D/loss_gp'] = d_loss_gp.item()

# =================================================================================== #
# 3. Train the generator #
# =================================================================================== #

if (i+1) % self.n_critic == 0:
# Original-to-target domain.
x_fake = self.G(x_real, c_trg)
out_src, out_cls = self.D(x_fake)
out_cls = out_cls[:, :self.c_dim] if dataset == 'CelebA' else out_cls[:, self.c_dim:] # 生成图片的属性只考虑一半
g_loss_fake = - torch.mean(out_src)
g_loss_cls = self.classification_loss(out_cls, label_trg, dataset)

# Target-to-original domain.
x_reconst = self.G(x_fake, c_org)
g_loss_rec = torch.mean(torch.abs(x_real - x_reconst))

# Backward and optimize.
g_loss = g_loss_fake + self.lambda_rec * g_loss_rec + self.lambda_cls * g_loss_cls
self.reset_grad()
g_loss.backward()
self.g_optimizer.step()

# Logging.
loss['G/loss_fake'] = g_loss_fake.item()
loss['G/loss_rec'] = g_loss_rec.item()
loss['G/loss_cls'] = g_loss_cls.item()

5.5.3 val and test

对当前图片生成两个数据集下不同属性的图片,也就是说,具有跨数据集生成图片的能力。

val:

1
2
3
4
5
6
7
8
9
if (i+1) % self.sample_step == 0:
with torch.no_grad():
x_fake_list = [x_fixed]
for c_fixed in c_celeba_list:
c_trg = torch.cat([c_fixed, zero_rafd, mask_celeba], dim=1)
x_fake_list.append(self.G(x_fixed, c_trg))
for c_fixed in c_rafd_list:
c_trg = torch.cat([zero_celeba, c_fixed, mask_rafd], dim=1)
x_fake_list.append(self.G(x_fixed, c_trg))

test:

1
2
3
4
5
6
7
8
9
10
11
12
13
14
15
16
17
18
19
20
21
22
23
24
25
for i, (x_real, c_org) in enumerate(self.celeba_loader):

# Prepare input images and target domain labels.
x_real = x_real.to(self.device)
c_celeba_list = self.create_labels(c_org, self.c_dim, 'CelebA', self.selected_attrs)
c_rafd_list = self.create_labels(c_org, self.c2_dim, 'RaFD')
zero_celeba = torch.zeros(x_real.size(0), self.c_dim).to(self.device) # Zero vector for CelebA.
zero_rafd = torch.zeros(x_real.size(0), self.c2_dim).to(self.device) # Zero vector for RaFD.
mask_celeba = self.label2onehot(torch.zeros(x_real.size(0)), 2).to(self.device) # Mask vector: [1, 0].
mask_rafd = self.label2onehot(torch.ones(x_real.size(0)), 2).to(self.device) # Mask vector: [0, 1].

# Translate images.
x_fake_list = [x_real]
for c_celeba in c_celeba_list:
c_trg = torch.cat([c_celeba, zero_rafd, mask_celeba], dim=1)
x_fake_list.append(self.G(x_real, c_trg))
for c_rafd in c_rafd_list:
c_trg = torch.cat([zero_celeba, c_rafd, mask_rafd], dim=1)
x_fake_list.append(self.G(x_real, c_trg))

# Save the translated images.
x_concat = torch.cat(x_fake_list, dim=3)
result_path = os.path.join(self.result_dir, '{}-images.jpg'.format(i+1))
save_image(self.denorm(x_concat.data.cpu()), result_path, nrow=1, padding=0)
print('Saved real and fake images into {}...'.format(result_path))

6. 其他

通过代码,我们可以猜出,对于starGAN,每一个domain都是一个二值属性,这些属性可以是互相排斥的,例如头发颜色,可以是不互相排斥的,并且这里和CycleGAN还是有一些区别的,CycleGAN的domain是数据集,source domain 和 target domain是风马牛不相及的,source domain和target domain有自己的风格,例如map数据集,是没有真值的,有的只是深度网络提取出的特征和70*70patchGAN.但是starGAN中,生成的图片和原始图片是一个数据集的,并且这两张图片不是要求风格一样,感觉这能应用到person-reid中也是神奇.

在图片真假的分类损失中,之前的GAN都是使用True和False来表示,这次换了一个新公式直接mean,还有点难理解。